
![]()
Apache CloudStack is open source software designed to deploy and manage large networks of virtual machines, as a highly available, highly scalable Infrastructure as a Service (IaaS) cloud computing platform. CloudStack is used by a number of service providers to offer public cloud services, and by many companies to provide an on-premises (private) cloud offering, or as part of a hybrid cloud solution.
CloudStack currently supports the most popular hypervisors: VMware, KVM, XenServer and Xen Cloud Platform (XCP).
The Apache CloudStack platform enables service providers to set up an on-demand, elastic cloud computing service. It enables a utility computing service by allowing service providers to offer self-service virtual machine instances, storage volumes, and networking configurations over the Internet.
The Apache CloudStack platform enables enterprises to set up a private cloud for use by their own employees. The current generation of virtualization infrastructure targets enterprise IT departments who manage virtual machines the same way they would manage physical machines. The Apache CloudStack platform, on the other hand, enables self-service of virtual machines by users outside of the IT department.
As an open source IaaS, Apache CloudStack is available to individuals and organizations that wish to study and implement an IaaS for personal, educational, and/or production use.
The CloudStack platform includes the Management Server and extensions to industry-standard hypervisor software (e.g. XenServer, vSphere, KVM) installed on Hosts running in the cloud.
The Management Server is deployed on a farm of management servers. The administrator provisions resources (Hosts, storage devices, IP addresses, etc.) into the Management Server and the Management Server manages those resources. The Management server presents web interfaces to end users and administrators that enable them to take actions on some or all of their instances in the IaaS cloud.

Prerequisites:
Management Server Hosts the sathish.com CloudStack Management Server Software.
Server.sathish.com
192.168.31.3 · 64-bit x86 CPU (more cores equals better performance)
· 2 GB of memory
· 80 GB of local disk
· At least 1 NIC
· CentOS 6.2 64-bit
· Statically allocated IP address
· Fully Qualified Domain Name as returned by the hostname command
Computing Node Provides all the CPU and memory resource for allocated guest virtual machines.
Host1.sathish.com
192.168.31.1 · 64-bit x86 CPU (max # of cores for better performance)
· Hardware virtualization support required
· 4 GB of memory
· 30 GB of local disk
· At least 1 NIC
· CentOS 6.2 64-bit
· Statically allocated IP Address

CloudStack Management Server: This server is the resource manager in the system. It controls allocation of virtual machines to Computing Nodes and assigns storage and IP addresses to the virtual machine instances.
CloudStack Computing Node: The Computing Nodes run the virtual machine instances. Servers are grouped into Zones and Pods. The initial installation has one Zone and one Pod.
The procedure for installing the Management Server is:
Prepare the Operating System
Install the Management Server
Install and Configure the MySQL database
Prepare NFS Shares
Prepare the System VM Template
Log in to your OS as root.
Check for a fully qualified hostname.
#hostname server.sathish.com
This should return a fully qualified hostname such as “server.sathish.com“. If it does not, edit /etc/hosts so that it does.
Turn on NTP for time synchronization.
Install the CloudStack packages. You should have a file in the form of “CloudStack-VERSION-N-OSVERSION.tar.gz”. Untar the file and then run the install.sh script inside it. Replace the file and directory names below with your own:
#tar xzf CloudStack-VERSION-N-OSVERSION.tar.gz
#cd CloudStack-VERSION-N-OSVERSION
# ./install.sh
You should see a few messages as the installer prepares, followed by a list of choices.
Choose “M” to install the Management Server software.
>M
Wait for a message like “Complete! Done,” which indicates that the software was installed successfully

The CloudStack management server uses a MySQL database server to store it’s data. When you are installing the management server on a single node you can install the MySQL server locally. When using a multi-node installation the MySQL database has to run on an external node.
The most recent version tested with CloudStack is 5.1.58. so choose version 5.1.58 or later
Installing mysql database:
#yum install mysql-server
#vi /etc/my.cnf
innodb_rollback_on_timeout=1
innodb_lock_wait_timeout=600
max_connections=350
log-bin=mysql-bin
binlog-format = ‘ROW’
#service mysqld start
#chkconfig mysqld on
#mysql_secure_installation
Set up the database. The following command creates the “cloud” user on the database.
#cloud-setup-databases cloud:<dbpassword>@localhost –deploy-as=root:<password>

#vi /etc/sysconfig/iptables
-A INPUT -p tcp –dport 3306 -j ACCEPT
#service iptables restart

Installing NFS:
NFS shares for primary and secondary storage on the same node with the Management Server. This is more typical of a trial installation, but is technically possible in a larger deployment. It is assumed that you will have less than 16TB of storage on the host.
# mkdir -p /export/primary
# mkdir -p /export/secondary
# vi /etc/exports
/export *(rw,async,no_root_squash)
# exportfs -a
# vi /etc/sysconfig/nfs
LOCKD_TCPPORT=32803
LOCKD_UDPPORT=32769
MOUNTD_PORT=892
RQUOTAD_PORT=875
STATD_PORT=662
STATD_OUTGOING_PORT=2020
# vi /etc/sysconfig/iptables
-A INPUT -m state –state NEW -p udp –dport 111 -j ACCEPT
-A INPUT -m state –state NEW -p tcp –dport 111 -j ACCEPT
-A INPUT -m state –state NEW -p tcp –dport 2049 -j ACCEPT
-A INPUT -m state –state NEW -p tcp –dport 32803 -j ACCEPT
-A INPUT -m state –state NEW -p udp –dport 32769 -j ACCEPT
-A INPUT -m state –state NEW -p tcp –dport 892 -j ACCEPT
-A INPUT -m state –state NEW -p udp –dport 892 -j ACCEPT
-A INPUT -m state –state NEW -p tcp –dport 875 -j ACCEPT
-A INPUT -m state –state NEW -p udp –dport 875 -j ACCEPT
-A INPUT -m state –state NEW -p tcp –dport 662 -j ACCEPT
-A INPUT – -m state –state NEW -p udp –dport 662 -j ACCEPT
# service iptables restart
# service iptables save
If NFS v4 communication is used between client and server, add your domain to /etc/idmapd.conf on both the hypervisor host and Management Server.
# vi /etc/idmapd.conf
Remove the character # from the beginning of the Domain line in idmapd.conf and replace the value in the file with your own domain.
Domain = sathish.com
Log in to the hypervisor host.
Be sure NFS and rpcbind are running.
# service rpcbind start
# service nfs start
# chkconfig nfs on
# chkconfig rpcbind on


On the Management Server, run one or more of the following cloud-install-sys-tmplt commands to retrieve and decompress the system VM template.
which is installed on the Management Server. Run this for each hypervisor type that you expect end users to run in thisZone. This will give the system maximum flexibility to run system virtual machines. This process will require approximately 10 GB of free space on the local file system each time it runs
# /usr/lib64/cloud/agent/scripts/storage/secondary/cloud-install-sys-tmplt -m /export/secondary -u http://download.cloud.com/templates/acton/acton-systemvm-.qcow2.bz2 -h kvm -F
#cloud-setup-management
#service cloud-management start
#chkconfig cloud-management on


Installing the CloudStack Agent on a KVM Host:
Hosts must be 64-bit and must support HVM ( Intel-VT or AMD-V enabled). All Hosts within
a Cluster must be homogenous. That means the CPUs must be of the same type, count, and
feature flags
Each KVM host must have the CloudStack Agent installed on it. Install the CloudStack Agent on each host using the following steps. Some of the steps in the installation procedure apply only to hosts running certain operating systems; these are noted at the beginning of the step.
Log in to the KVM host as root.
# hostname host1.sathish.com
This should return a fully qualified hostname such as “host1.sathish.com”. If it does not edit /etc/hosts so that it does.
Remove qemu-kvm. CloudStack provides a patched version.
# yum erase qemu-kvm
Install the CloudStack packages. You should have a file in the form of “CloudStack-VERSION-N-OSVERSION.tar.gz”.
Untar the file and then run the install.sh script inside it. Replace the file and directory names below with those you are using:
# tar xzf CloudStack-VERSION-N-OSVERSION.tar.gz
# cd CloudStack-VERSION-N-OSVERSION
# ./install.sh
You should see a few messages as the installer prepares, followed by a list of choices.
Choose “A” to install the Agent software.
>A
# service rpcbind start
# service nfs start
# chkconfig nfs on
# chkconfig rpcbind on


If NFS v4 communication is used between client and server, add your domain to /etc/idmapd.conf. You should have already done this on the Management Server host.
# vi /etc/idmapd.conf
Remove the character # from the beginning of the Domain line in idmapd.conf and replace the value in the file with your own domain. In the example below, the domain is company.com.
Domain = sathish.com
Set a Time Synchronization with management server
Create a bridge device cloudbr0 and add your eth0 to the bridge cloudbr0
#cloud-setup-agent

#service cloud-agent start
#chkconfig cloud-agent on
#iptables -I INPUT -i cloud0 -j ACCEPT
#iptables -I FORWARD -i cloud0 -o cloud0 -j ACCEPT
#iptables -I FORWARD -i cloudbr0 -o cloudbr0 -j ACCEPT
#iptables –I INPUT -m tcp -p tcp –dport 5900:6100 –j ACCEPT
#service iptables restart
#service iptables save
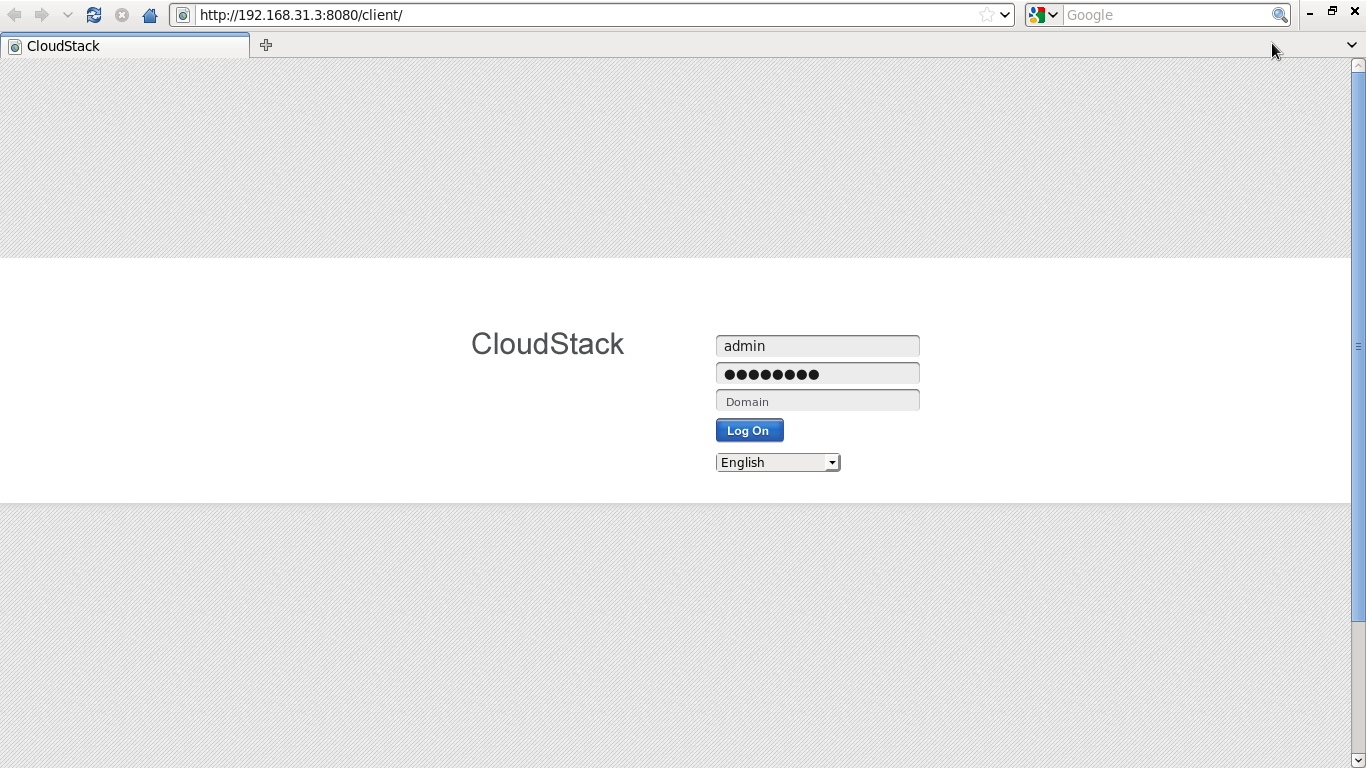
Now your CloudStack Management Server is running. The next step is to tell it about the hosts, storage, and network configuration that you have done in the previous sections. Launch a web browser http://192.168.31.3:8080/client
The default credentials are “admin” for user and “password” for password. The domain field should be left blank. A blank domain field defaults to the ROOT domain
Adding Zone:
A zone is the largest organizational unit within a CloudStack deployment. A zone typically corresponds to a single datacenter, although it is permissible to have multiple zones in a datacenter. The benefit of organizing infrastructure into zones is to provide physical isolation and redundancy.

Adding Pods:
A pod is the second-largest organizational unit within a CloudStack deployment. Pods are contained within zones. Each zone can contain one or more pods; in the Basic Installation, you will have just one pod in your zone.


Adding Clusters:
A cluster provides a way to group hosts. The hosts in a cluster all have identical hardware, run the same hypervisor, are on the same subnet, and access the same shared storage. Virtual machine instances (VMs) can be live-migrated from one host to another within the same cluster, without interrupting service to the user.

Adding Hosts:
A host is a single computer. Hosts provide the computing resources that run the guest virtual machines. Each host has hypervisor software installed on it to manage the guest VMs.
Provide the CPU, memory, storage, and networking resources needed by the virtual machines
Interconnect using a high bandwidth TCP/IP network and connect to the Internet
May have different capacities (different CPU speeds, different amounts of RAM, etc.), although the hosts within a cluster must all be homogeneous

Adding Primary Storage:
Primary storage is associated with a cluster, and it stores the disk volumes for all the VMs running on hosts in that cluster

Adding Secondary Storage:
Secondary storage is associated with a zone, and it stores the following:
Templates – OS images that can be used to boot VMs and can include additional configuration information, such as installed applications
ISO images – disc images containing data or bootable media for operating systems
Disk volume snapshots – saved copies of VM data which can be used for data recovery or to create new templates


Log in to the CloudStack UI.


Verify that the system is ready. In the left navigation bar, select Templates. Click on the CentOS 6 (64bit) no Gui (KVM) template. Check to be sure that the status is “Download Complete.” Do not proceed to the next step until this status is displayed.

Public: The template is available to all users in the zone.
Private: The template is available only to its owner. A user can make her private templates available to specific users.

Administrators and end users can add templates to the system. Users can see the template owner when viewing the template.
Go to the Instances tab, and filter by My Instances.
Click Add Instance


To use the VM, click the View Console button.


I installed and configured successfully. thanks a lot